Smartphones have made it comfortable to take and save pictures. Thanks to modern devices people can catch unforgettable points of their lifetime. Unfortunately, in Galaxy s 10 Plus just like in the other mobile cell phone memory for photos is quite limited.
But there comes a time in daily life when every user wonders about moving transfer images from Samsung s10 to another data media or device to clear the storage.
So appears the question of how to download all the photos from Samsung Photos. The memory stick is the most commonly used thing to move and save information, also it can help to send import pictures to friends and relatives and transmit them to different storage.
For any of these cases, our article will give you appropriate advice on how to transfer photos from an Android cell phone.
Transfer Images from Samsung Galaxy S10 to A USB Drive via USB Cable
Downloading a transfer file explorer from a computer to an Android device via USB is easy. Android users can transfer data between their cell phones and computer with ease. The software on Android 13 is more flexible than cell phone software.

Many people prefer smartphones to iPhones. To download a file explorer to a Samsung Galaxy S10, connect it to your PC via a cable. Check for permission prompts on the screen. Change the connection mode to avoid data loss. Select the connection mode for data transfer using the touch button and choose the device (MTP) option.

Transfer photos from Samsung S10 to USB stick with Windows Explorer
To move data from Samsung data onto usb debugging sticks without external applications, use local Windows settings. Here are the steps to transfer scanned photographs from a Samsung S10 to an XPS USB drive using a pop up window XP computer:
/cdn.vox-cdn.com/uploads/chorus_asset/file/14843663/akrales_190228_3255_0525.jpg)
1. Plug in the Samsung and the USB stick.
2. Select the device from the computer and decide on internal storage and SD card from the drive.
3. Select the insertable USB flash drive and go back. This method is not exclusive.
Transfer Photos from Samsung to USB Flash Drive without Computer
To transfer photos from Samsung to USB, use a computer with OTG cables or micro-USB drives. Connect the phone to the computer and check if it’s connected to a smartphone. Test this with a micro-USB, USB flash drive, or OTG drive.
Use a third-party USB OT checker for connectivity. Connect the flash to the mobile via OTG connection and give the user access to all the all the photos via the internet.
The 1st approach: how to move pictures from Samsung S10 using USB flash drive

Owners of Samsung have opportunity to picture information by means of USB wire. It is much easier to transfer and transfer contacts in comparison with iPhone. Thus, users often give preferences for Samsung models.
Point 1.You should carefully link s 10 and computer using USB wire, and wait until msg on the display appears.
Point 2. Modify the connection way in order not to lose personal information. Then move your finger, select the mode of connection. Push “touch for other USB options”, and contact by means of the media device.
Point 3. Make sure that the Samsung s10 is linked properly and choose “This PC” on the computer. Find Samsung connection in portable devices. Look for photo files and relocate them on your PC from s10. After that, contact the USB and copy these transfer files there.
The 2nd approach: how to export and import pics optionally
Syncios Mobile Manager’s assistance will be useful to perform this manipulation. It’s expert service for transmission images from mobile phone to USB flash drive. Using this super toolkit, you’ll forget about exhausting process of transferring pictures and seeking necessary file among hundreds similar ones.
On the contrary, you should transmit s 10 pictures to removable storage quite easily and fast.

Point 1. Set up Syncios Mobile Manager on computer. Launch this service, and activate USB debugging mode on Samsung. Next, plug wire of USB debugging in pc and link usb debugging between two devices this way.
Point 2. Start removing s 10 pics in computer. On the right version of front display, guide to pictures making sure that personal information complete loading.

Your images will be classified according their native folder, so that you could look for preferable pics really fast. It’s possible to transfer photos to an USB debugging stick, so choose those that you want to remove. Mark photo folders you want, tap export, and transfer pictures to computer.

The 3rd approach: one touch to make copy and restore S10 images
With Syncios Data Transfer help, we will easily solve the problem of how to just transfer photos from Samsung, to google drive from your Samsung.
Even with hundreds of pics saved on Galaxy S10 can easily move them from phone to a flash drive using this service. It is a successful and reliable method, for s10 with infinite number of pics. Just pull images to the DCIM folder, saving all characteristics, quickly and effortlessly. Users also have opportunity to copy pictures, store and recover them if necessary.
Point 1.Open Syncios Data Transfer on S10, in the case you have installed it before. Choose Toolkit and then tap Phone transfer. Connect mobile and PC, push Backup and tap Next

Point 2. All Samsung finding are ruled by Syncios Data Transfer developed for photos, video tutorial list of contacts, music player,
and things like that. After you relocate data to a computer, choose Select camera roll and photo library. It will receive files will upload soon, so push Next
Point 3. So, you have transmitted Galaxy S10 photos to a computer with Syncios. View them on PC. Contact it using USB drive and download pictures remove data there.
Note: to move saved images back from the computer screen, link Samsung Galaxy with PC, navigate Restore, push Syncios Backup, choose backup and recover import photos on the USB drive.

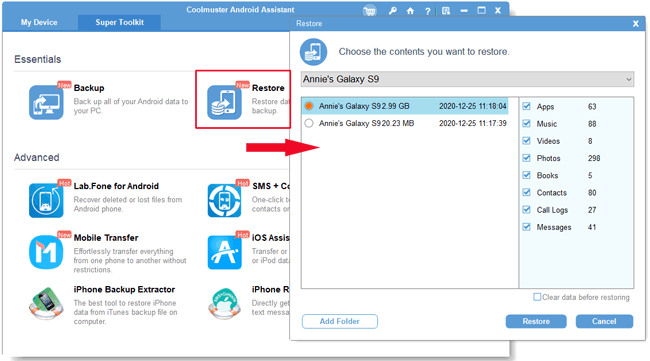
Part 4: Best Way to Transfer Photos from Samsung to PC via Coolmuster Android Assistant
The best way to transfer photos from a Samsung to a PC is using Cool Muster Android Assistant. It completes the job quickly and won’t damage any data on your Samsung.
This program can do anything you can imagine, like backing up and restoring Samsung data with just one click, managing multiple Android devices simultaneously, and assisting with transfer contacts, SMS, and Call Logs.
It’s great news for new users who are confused about transferring photos and data between their phone and computer.
The software is compatible with most Samsung and tablets. These include the Samsung Galaxy S10, S9, S8, S7, S6, S5, and S4. It also works with the Samsung Galaxy Note series, including the Note 9, Note 8, Note 7, Note 6, and Note 5. Additionally, it is compatible with the Samsung Galaxy J3 and J3 Pro, as well as the A9, A8, A7, A5, and other models.
Part 5: How to Transfer Photos from Samsung Galaxy to Computer via Google Drive
Google Drive is cloud storage that can transfer photos from a Samsung Galaxy to a computer. It offers 15 GB for free users, which is the biggest storage among all cloud storage. It may be the best option for new users.
Before the steps, you need to download and install Google Drive on your iPhone and computer.
![]()
Step 1: Turn on Google Drive on Your Samsung and Upload the Photos.
Open the Gallery app on your phone and select the images that you want to transfer. And then click “Share” icon and tap “Save to Drive“. Use Google Drive account to import photos, log in Google Drive and choose the folder to save your pictures.
![]()
Step 2: Find the Folder named “Google Drive” on PC to View the Pictures from Samsung.
After you download the photos to Google Drive, you will see the folder named “Google Drive” on your PC, tap on the icon and the pictures will appear on your right hand that from your Samsung.
![]()
Note: Because of the limitation of the Google Drive, you can’t select more media files than 10 photos at once.
How to Transfer Pictures from Laptop to Samsung Phone with 1 Click or Selectively
Need to send photos from your Samsung to your laptop? Unsure of how to do it? Don’t worry, we’ve got you covered with a clear and easy-to-follow guide.
Steps about transferring pictures from laptop to Samsung with 1 click:
Step 1. Install the gallery app and Connect Samsung to your Laptop
To transfer photos from your Samsung device, install the Samsung Photos Transfer app. Connect your Samsung galaxy note to your laptop using a USB cable.
Step 2. Choose Photos on the App
To transfer photos, go to the Photos section. Select the photos you want to transfer by ticking them.
Step 3. Transfer Photos from Laptop to Samsung
To transfer pictures from a laptop to a Samsung device, select them first. Then, tap on the “Add” button to complete the transfer process.
Note: How to transfer pictures from a laptop to a Samsung phone with 1 click? Please follow the steps below.
– Go to “Super Toolkit” and tap on “Restore“, then it will appear a small window for you.
– Then select your Samsung and tap on “Restore” at the bottom of the interface. The transfer is finished.
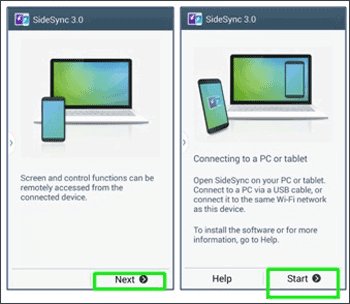
How to Transfer Photos from Samsung to PC Using SideSync
With SideSync, you can share your Samsung phone screen and transfer files with your PC or tablet. It works on Android 4.4 or later, Windows XP SP3 or later (32/64 bit), and Mac OS X 10.7 or later from version 4.0.0.15095_2. To download pictures from your Samsung phone to your computer using SideSync, follow these steps carefully.
Here is the guide of SideSync:
Step 1. Download the App on your PC and Samsung phones
In the beginning, you need to download SideSync both on your PC and Samsung phone. Install it, tap “Next” and “Start” on both devices.
Step 2. Connection
You can connect your Samsung to your computer with a cable. The app will automatically link the two devices. If you don’t have a USB cable, you can use a QR or Pin code that will appear on your computer or screen to establish a connection.
Tap on “OK” on a confirmation, pop up window back-up widow.
Notice: Both devices are required to connect to the same Wi-Fi.
Step 3. Samsung Phone Appears on Computer
When the connection is successful, the screen of your Samsung phone will appear on your computer and you can move, increase or decrease it on the desktop.
Step 4. Drag your Photos from Samsung Phone to PC
In this step, you need to click the phone screen on your PC first.
Then navigate to the Photos folder that you want to transfer photos to. You can put these import pictures into the same folder.
At last, drag the folder to your computer’s desktop or a folder you like.
Summary
Different methods for moving data from Samsung Galaxy S10 exist. In our guide are represented the finest ones. With Syncios tool, it is easy to choose photos, succeed in this procedure and get an ideal result.
How to transfer photos from Samsung S10 to a USB stick without a computer?
To use an OTG flash drive, first import photos from your microSD card into your PC or Samsung phones folder. Then, click on File and choose the document you want to copy photos transfer. Press the file to move it. If you want to move a folder, you must select ALL.

How do I transfer photos from my Samsung to my computer?
To connect your iPhone and computer, use a cable. Charge your smartphone by tapping a notification. Then, click “Use USB for transferring media files.

YOU MAY ALSO LIKE...


Leave a Reply